Missing calls happen all the time, even when you’re right next to your phone. Whether you’re driving, cooking, or deep in a meeting, there are moments when tapping “Accept” answering calls promptly just isn’t possible.
That’s where auto-answer comes in. It picks up the call for you, automatically, so you never miss what matters. It helps you automatically answer calls so you don’t need to manually pick up your phone, making it ideal when you’re busy with other tasks. This feature ensures you never miss an important call, especially during crucial moments.
If you manage customer calls, run a support team, or just prefer a hands-free setup convenience, this guide will show you exactly how to turn auto-answer on, step by step, for both Android and iPhone.
✨TL;DR
Auto-answer is a phone feature that automatically picks up incoming calls after a set delay, without requiring you to tap or swipe. It is commonly used for situations when you’re unable to pick up calls or you need high-volume call handling.
- To automatically answer calls on Android: Go to Phone App → Settings → Answer/End Calls → Turn ON Auto-Answer → Set your preferred delay time.
- To enable auto answer on iPhone (Apple): Settings → Accessibility → Touch → Call Audio Routing → Auto-Answer Calls → Turn ON and adjust delay
While useful for basic call handling, auto-answer lacks features such as call routing, analytics, and team collaboration, which are essential for business use.
What auto answer calls actually means?
Auto-answer calls is a feature that automatically picks up incoming calls after a short delay, without you needing to press any button or swipe the screen. After a few seconds or one ring, your phone connects the call on its own.
This feature is available on many smartphones and VoIP systems, often as part of accessibility or business settings. It makes answering calls hands-free and faster.
It is useful for people using headsets or working in busy environments because they can stay focused without stopping to answer calls manually. However, it also means the call connects immediately, so you should be ready to speak when it starts.
Related more: How to Turn Off Call Forwarding on Any Device?
When should you use auto answer phone calls?
You should use auto-answer when it helps you work more efficiently and not miss important calls. It is useful in situations where quick responses are needed, calls are important, or hands-free use is necessary. It can also improve accessibility for people who may have difficulty answering calls manually.
Here is a breakdown of when you should use auto-answer for phone calls:
1. For handling high-volume inbound customer calls
When call volume spikes unpredictably (e.g., product launches, promotions, or service outages), auto-answer prevents callers from hitting busy signals or long hold queues. It ensures consistent first-response timing, which is critical for SLA compliance and for reducing caller abandonment.
2. Hands-free situations
Auto-answer helps you pick up calls without touching your phone. You don’t need to find, tap, and unlock your device during work. Eventually, it helps you continue your work without interruption.
3. High-volume customer support and sales teams
Auto-answer is useful for busy customer support and sales teams because it makes sure no calls are missed. Instead of sending callers to voicemail, it quickly connects them to an available agent. This helps respond to customers faster, improve sales, and make the team more efficient by reducing the need to manually pick up each call.
4. When using specialized equipment
They are commonly used in call centers, where agents use headsets to automatically answer the next call without pressing a button. It triggers on ring detection or a platform signal, enabling “one-touch readiness”: agents stay focused on screen tasks while remaining instantly available. This reduces post-call manual steps and supports lean call handling metrics.
How to turn on auto answer calls (step-by-step)
The methods differ slightly between Android and iPhone. Here’s a step-by-step guide to turn on auto-answer calls on Android or iPhone devices.
How to turn on automatic answer on Android
Android phones’ auto-answer steps vary slightly by phone brand. Here are the following steps to enable auto-answer calls on your Android device:
Step 1: Locate and tap the “Phone” icon on your home screen (typically at the bottom left).
Step 2: Tap the “three horizontal lines (hamburger menu)” or the menu icon located in the top left corner of the “Search contacts” bar.
Step 3: From the sidebar menu that appears, “Go to Settings”.
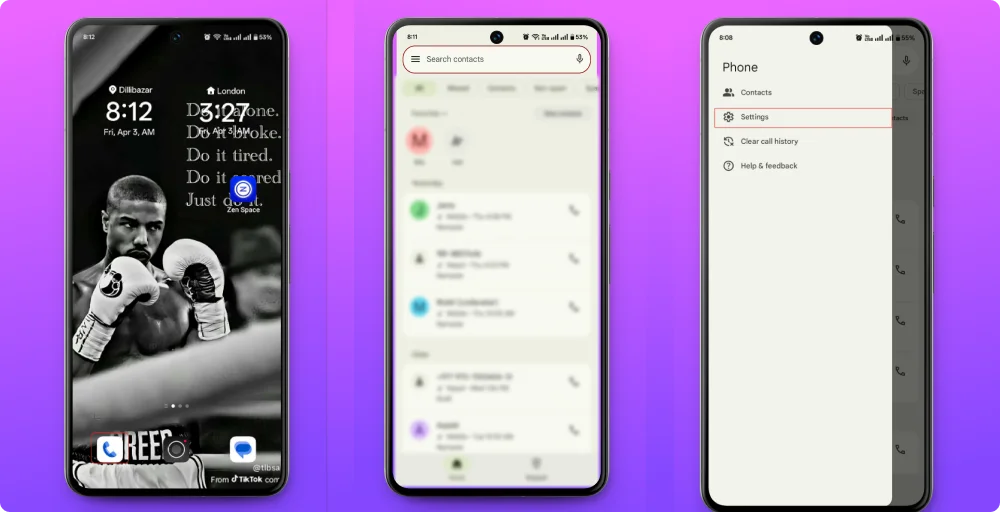
Step 4: In the Settings menu, scroll down to the “General” section and tap on “Calling accounts” and “Open Calling Accounts”.
Step 5: Tap the first option labeled “Answer/End calls”.
Step 6: Toggle Auto-Answer. Find the option “Auto-answer calls when connected to external audio device” (this applies to Bluetooth or wired headphones) and tap the switch to turn it “ON”.
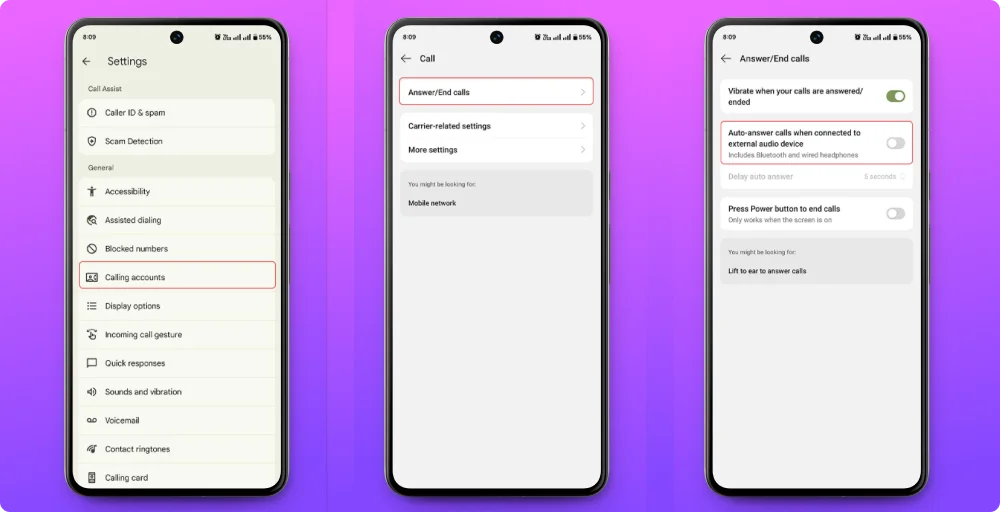
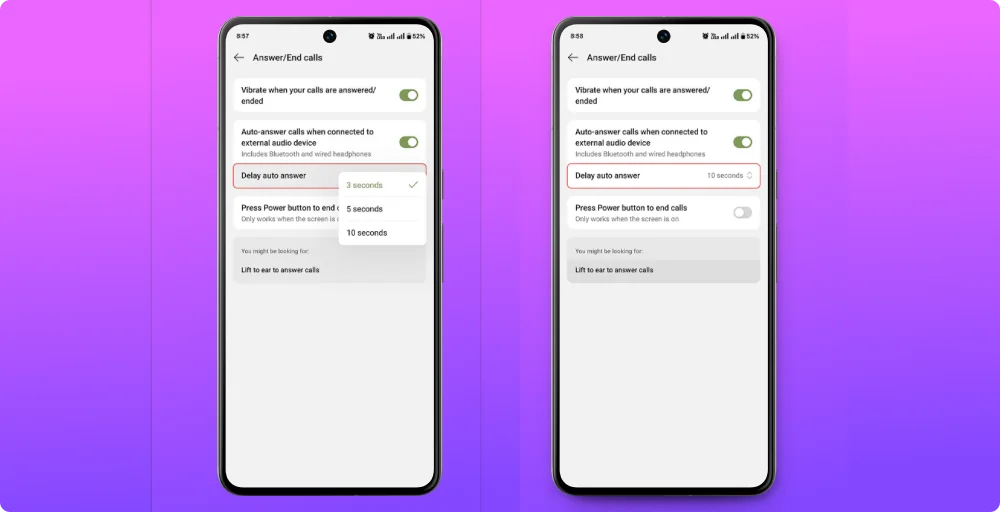
Step 7: Once enabled, tap on “Delay auto answer”. A pop-up will appear with different delayed time intervals (e.g., 3 seconds, 5 seconds, 10 seconds). Select and save your preferences.
Step 8: Your setting is now active. You will see the selected time (e.g., “10 seconds”) displayed next to the “Delay auto answer” label.
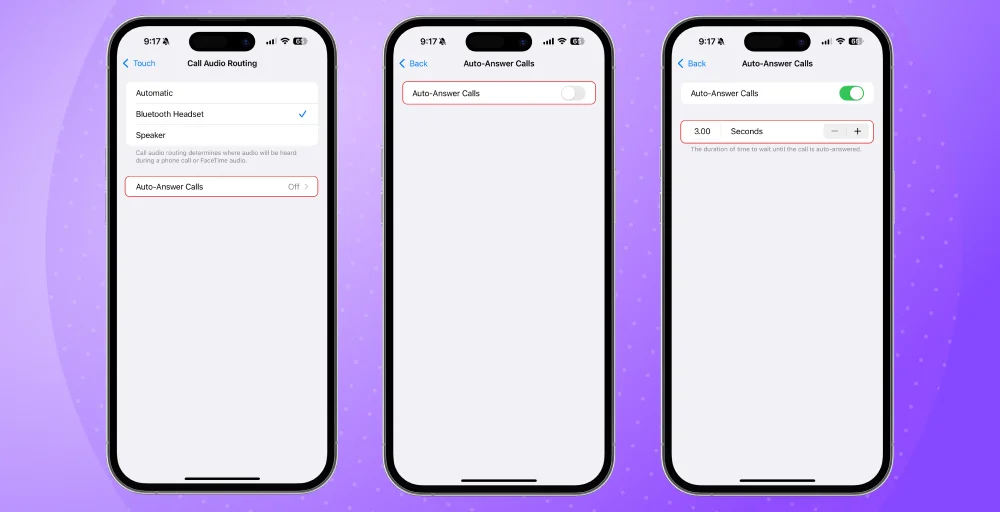
How to turn on automatic answer on iPhone
Here are the steps to find and set up the ‘Bluetooth Headset’ audio routing and auto-answer feature on your iPhone.
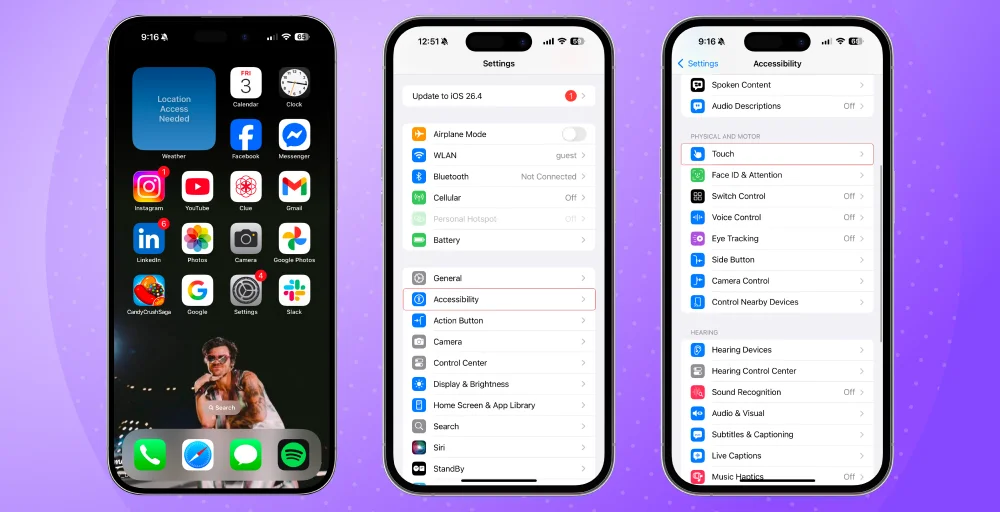
Step 1: Find the Settings application on your iPhone’s home screen and tap it to launch.
Step 2: From the main ‘Settings’ list, tap the Accessibility menu.
Step 3: In the Accessibility menu, under the “Physical and Motor” section, tap Touch.
Step 4: Scroll toward the bottom of the Touch menu to find and tap the Call Audio Routing setting.
Step 5: On this screen, tap on Bluetooth Headset. A blue checkmark will appear next to it, indicating all future call audio will automatically route to your headset.
Step 6: After selecting the headset option, look at the bottom of the same screen and tap on the Auto-Answer Calls row.
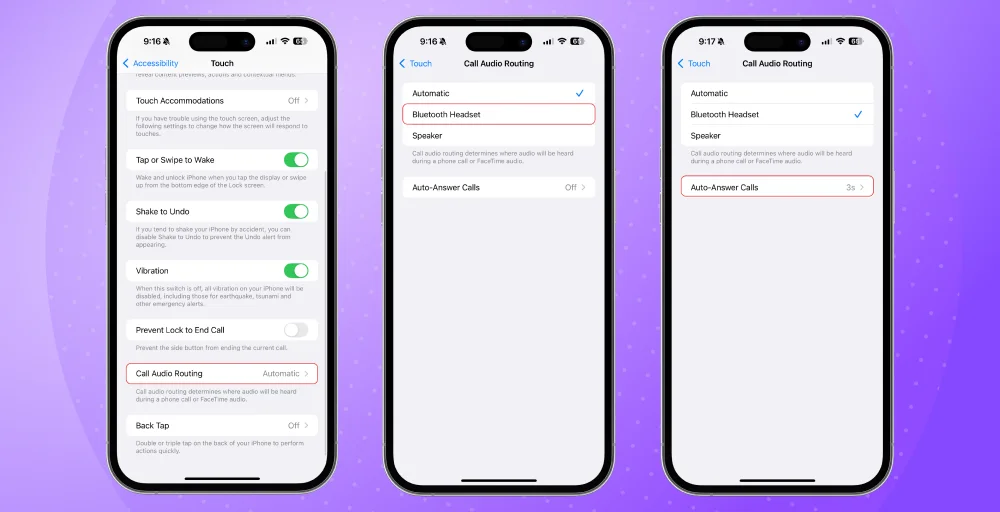
Step 7: Opens the specific menu for the auto-answer feature.
Step 8: Tap the toggle switch next to Auto-Answer Calls. It will turn green when it is enabled.
Step 9: Once the feature is green, you can use the plus (+) and minus (-) buttons to adjust the exact duration (in seconds) your phone should wait before automatically answering the call.
Related Article 👉: Call Barring: How to Enable or Disable on Android & iPhone?
Disadvantages of auto answer calls
Auto-answer call features, while beneficial for 24/7 availability, present significant challenges for both personal and business use to receive calls. The drawbacks include answering unwanted spam, security concerns, a lack of intelligent screening, and logistical issues in team settings.
1. Answers every call (including unwanted ones)
Auto-answer cannot distinguish between a legitimate caller and a telemarketer or scammer. This can let unwanted callers know your number is active. It also means your phone answers calls when you might not want it to, like during a meeting, while driving, or in a noisy place.
2. No smart control over WHO gets picked up
Customers overwhelmingly prefer speaking to a human rather than a robotic prompt or an instant auto-pickup, often viewing it as a “dead end”. Auto-answer treats a high-value client call the same as a wrong number or a nuisance call, wasting valuable time.
3. Ineffective for teams/call centers
Agents often experience continuous, back-to-back calls without time to take notes or breathe, leading to frustration and, in some cases, “call avoidance” behaviors. When an agent finishes notes from a previous call, the next call may auto-answer, disrupting their work and leading to a poor customer experience.
4. Potential loss of business
Many callers will not leave a voicemail when greeted by an automated system, resulting in lost business opportunities. Automated systems cannot understand emotional situations or complex queries, resulting in caller frustration
Check Out 👉: How to Block Text Messages on iPhone and Android?
How to turn off auto answer (when you don’t need it)
To turn off the auto-answer feature on your phone, you need to adjust specific accessibility or phone app settings, which are often activated by Bluetooth connections.
Turn off auto answer on iPhone
Follow the steps below to turn off auto-answer on iPhone:
- Open the Settings app.
- Tap on Accessibility.
- Under the “Physical and Motor” section, select Touch.
- Scroll to the bottom and tap Call Audio Routing.
- Tap the Auto-Answer Calls row at the bottom.
- Tap the green toggle switch next to Auto-Answer Calls so it turns gray (Off).
Turn off auto answer on Android
Android steps can vary slightly by manufacturer (Samsung, Pixel, etc.), but the process is generally found in the Phone app settings. Here are the steps given below to turn off auto-answer on Android:
- Open the Phone app on your device.
- Tap the three-dot menu (More) in the top-right corner.
- Select Settings.
- In the Settings menu, scroll down to the “General” section and tap on “Calling accounts” and “Open Calling Accounts”.
- Tap the first option labeled “Answer/End calls”.
- Find the option “Auto-answer calls when connected to external audio device” and tap the switch to turn it “Off”.
Related more 👉: How to Record a Phone Call on iPhone & Android?
Is auto answer enough for business calls?
Auto-answer is a good start for solo professionals or small teams. The basic auto-answer feature allows users to receive incoming calls automatically based on saved settings, removing the need to manually press a button. This is especially helpful for multitasking individuals or call center agents who need to respond promptly to reduce response times.
If you’re handling more than a handful of calls a day, it’s worth moving beyond basic auto-answer and upgrading to a proper business phone system. That’s where a business calling solution like KrispCall makes a real difference.
KrispCall gives you smart call routing, auto-attendants, shared phone numbers, and call analytics, so your team never misses a call, and every call gets handled the right way.
Book a demo to see KrispCall in action.